Built in Bed - How To

So… my husband and I live in a very wonky house in Devon (UK), made of cob. There is not one straight wall or floor in here – which makes using it as my photography studio incredibly difficult. I briefly moved my nursery art business out into a huge studio, thinking that having more flexibility of space would make photographing my art easier. It just didn’t work for me at all – I felt uninspired, I was lonely working down there on my own, and I often need my husband to help me lift or move things – well he was a 30 minute drive away, so not practical at all…
I moved the business back into our house – a lot of peeps seem to think my little business is large, but it’s just me doing everything from doodling, styling to admin (hi, I’m Rachael for those who don’t know!)… our conservatory is now a big storage room, along with a large en-suite upstairs (literally both crammed to the rafters with toys, kids beds and accessories!). The spare bedroom (the wonkiest one in the house!), is now my photography studio / come spare bedroom for our friends and family!
Now, this room had a little alcove in it which was, you’ve guessed it, very wonky, but it also had some ugly boxing which hid pipes. The wallpaper was wood-chip and it just felt like not a great use of space to leave it open. We rent this house, so I never like to spend too much on built in furniture, as we plan on buying a house as soon as this crazy housing market calms down… so… I decided to build a built-in bed, with play / storage area above, BUT one that didn’t attach to the walls – the beauty of that being that we can remove it when we move and either take it with us, or not lose money on our deposit. We’re very lucky, the landlords love it and want it to stay, even once we’ve gone!
BEFORE: Below is how the room looked before we started...

DISCLAIMER – this blog post and the advice and imagery contained within, are purely for inspirational purposes only. This bed was built by my Dad who is both a rather clever engineer by profession and advanced at woodwork. He understands how to make a structure which is both safe and load-bearing. If you are a novice, I recommend that you hire a professional to construct something like this for you (unless you’re feeling brave!). Pretty in Print Art Ltd cannot be held responsible if you build an unsafe structure, nor if you or a child is injured whilst constructing or using it. It is your own responsibility to ensure you are happy with what you build, ensure it’s robust enough for the weight of your children and teach them how to use it safely.
ABILITY LEVEL – Intermediate to advanced, you need to know what you’re doing and have an understanding on how to make a structure both safe and stable
COST – £300 - £600
TIME – 3 full days
LABOUR
I was very lucky and my Dad arrived armed with all of his tools to help me make mine. I did get a quote for a local carpenter to come and build this for me, but I couldn’t afford him at £600 for 3 days labour, plus materials. With that said, often the carpenters can get materials at trade price, which is worth taking into consideration – this carpenter was also a perfectionist, so others may have been cheaper. In the end though, my Dad was happy to help and it was lovely spending the time with him – although I was as much use as a chocolate teapot!
MATERIALS
Wood and fixings should cost £300-£500 depending on what size you build – we went to our local Travis Perkins and used:
- FRAMEWORK 2x4 C24 Kiln dried sawn timber (£9-£11 each)
- PLAY AREA BARS 47mm x 50mm x 3.6m sawn timber
- WALLS / CEILINGS / CLADDING Standard MDF sheets (2440x1220mm at 12mm thickness) for the interior walls, ceilings and cladding (£30 per sheet – prices were particularly high at the time of building)
- Standard wood screws – make sure they are long enough to go through the timber you use
- BED SLATS we repurposed bed slats from an IKEA junior bed that was no longer being used. We had to trim them down on each edge slightly, but it worked brilliantly. Failing that, you can use straight slats of wood and nail them down onto the frame
- LADDER I liked the look of a rope ladder – a friend gifted this one to me, but you can buy rope ladders online / amazon for kids. Or search for “bunk bed ladder” for other possibilities. Rope ladders are very simple to make, so if you’re the handy type, you could buy some nice rope and repurpose this cheap ladder on amazon: HERE
- OR LADDER HERE: https://ropework-uk.com/rope-ladders/
- WOOD GLUE
- PAINT
- MDF PRIMER
If you’re going to have a go yourself, then I would recommend having the basic tools below:
- Power drill / screwdriver
- Power sander - I have a £30 Bosch one from Amazon, and it’s so handy
- Spirit level
- Saw – a jigsaw or rotary saw will make life easier, but a hand saw will still work
- Clamps – you will want to clamp something straight to the MDF to get straight cuts with the Jigsaw
- Hammer
- Rubber Mallet or use a hammer with a block of wood to protect what you are hitting
- Pocket Hole Jig Kit HERE
**of course, you don’t need to have power tools for all of this, but they will speed up how quickly you can finish. You can hire most power tools from local DIY stores
SIZE
The space I filled was almost the perfect size for a junior size mattress (100cm in length) – our space was tricky as we wanted to square it off (so wonky!) and cover up some ugly plug sockets. Because of this, we made it a lot deeper than it needs to be, that said though, the depth is lovely as it creates more of a play den feel, leaving a little seating area at the back, which is also a useful storage place for bedtime story books, cuddly toys or a night lamp.
STEP ONE
Plan your ideas – I found it useful to draw on top of a photograph in order to get the idea of what was in my head, over to a carpenter / my Dad. Below are the images I sent to them, demonstrating the idea of a timber frame, clad in MDF.


STEP TWO
You will need to measure up your space so you know how much wood and MDF you need. Battens of wood and MDF tend to come in standard sheet sizes, which often won’t fit in your car, so plan ahead to get items delivered. Wait times can sometimes be a week or more. We made our frame freestanding, as we’re in rented we didn’t want it be fixed to the walls, so we used thicker wood and MDF to make the structure solid. You may be able to get away with using thinner materials, if you screw yours to the wall, but please take professional advice on this. I have always found the team at Travis Perkins to be very helpful – so it’s worth asking your DIY store for advice too.
Things to consider:
- What height do you want the bed at? Got low ceilings? Put it lower to the floor, or on the floor – you won’t need to build a base then. We had plug sockets we wanted to hide, plus a very uneven floor, so this dictated the height of our base. The plus side was that it created some much needed storage for toys underneath. We didn’t have the patience to build drawers, so I access mine by simply lifting up the removable bed slats. A pull out drawer would be great though if you can afford it!
- Next decide on the height of the floor for your play area or storage area above – I chose to have more head space in the bed area, but purely for photographic purposes. Have a think about how your child may predominantly use each space and decide from there – REMEMBER to take into account the depth of the frame, which will be dictated by the size timbers you use
- Choosing a depth is important – go too narrow and it won’t feel like a useable space. I mentioned earlier that ours was dictated by needing to cover up some plugs, so take a look around and see if there is anything like that you need to consider. I can still access the plugs, plus it hides unsightly leads etc – it’s super handy for plugging in nightlights
STEP THREE
Start constructing your frame – the measurements for this will depend on your space.
Things to consider:
- You’ll see on our wood, that there are pilot holes drilled at an angle. You’ll need to use a thing called a Pocket Hole Jig to create these. It does make life easier, but it also makes the structure safer by pulling the wood tightly into place and hiding the screw heads
- You’ll see our frame doesn’t touch the walls – this was twofold; 1.) we needed to create a square frame as the walls were very wonky and 2.) we live in a rented house and didn’t want to fix the frame to the wall. It’s completely freestanding. If you need to square up the space, this is when you need to consider that. If you’re lucky enough to live in a house with perfectly straight walls and floors, then you might not need to
- Check your mattress width, and remember to build the base for that too

STEP FOUR
Cladding – once your frame is complete, you can start to clad the inside of your bed. You’ll need to measure and cut your MDF to size – we chose to use a router to cut vertical grooves down the panelling to make it look like tongue and groove / shiplap walling. You could also buy pre-cut panelling if you like this look – if you choose to do this, the panels will be cut to a specific size, so you’ll need to take that into account when measuring and building your framework. Cutting the grooves is easy, we used the same technique as this video: https://www.youtube.com/watch?v=VZHi6CXAt9A
TIP: We clamped two perfectly straight pieces of MDF either side of our router, to act like a jig and keep it straight – I highly recommend this as it’s very hard to keep it straight with just one guide on one side (like in the video).
We chose to cut our MDF so that the two side panels would wedge in the back panel, meaning we didn’t need to nail or glue the panels into place. To do this, cut your back panel to fit the back space entirely, then cut the two side panels to fit snugly in the remaining space. We then used a rubber mallet to hit them into place – be careful though as the MDF can break and chip in the corners if you use too much force. If it’s not going into place without lots of force, take it out and sand the edges gradually, until it’s a better fit.
Repeat the above until you have clad all ceilings, floor and walls. Leave space for where you will place your mattress – and if you’re not using pre-made mattress slats, create your bars. You can see we inserted two parallel bars for our mattress slats to sit on.


STEP FIVE
BEFORE you clad the outside, you need to insert your bars on the top play area (if you’re following our design). I initially wanted a rope net across this area, but I only had my Dad with me for a couple of days, hadn’t planned ahead and so didn’t have time to order the rope net. I did get a quote from Ropework UK though, who quoted me £45 per square meter. I do think the scramble rope nets look great in the play area – and I expect Ian at Ropework could advise how best to fix it to the frame too.
https://ropework-uk.com/product/scramble-net/
For our bars, we used 47mm x 50mm x 3.6m sawn timber – I rounded off the edges with a hand sander, so they’re softer, then use your hole jig to cut the angled guide holes in each end of each upright bar to make screwing them into the frame easier. When measuring up, remember you will want enough wood for the spacers between each bar too – top AND bottom. Glue and screw the spacers into place, then screw your upright bars into the frame.


STEP SIX
Clad the outside of your frame with MDF

STEP SEVEN
Fill all holes with filler, leave to dry, then sand down
STEP EIGHT
Paint! DO use an MDF Primer – I used this one by Dulux. If you do not use a primer, the MDF will soak your paint up like a sponge. You can then use matt emulsion paint on the bed, but for durability, use eggshell paint, or try adding some sort of matt clear varnish over the emulsion will help protect against knocks and scuffs. As mine is purely for photography purposes, I haven’t done this as it will be painted often – and life is too short to sand the entire bed each time before painting!


STEP NINE
Your bed is now finished, but if you like the tree / greenery style paint effect I've created on mine, then read on... it's SO SIMPLE!

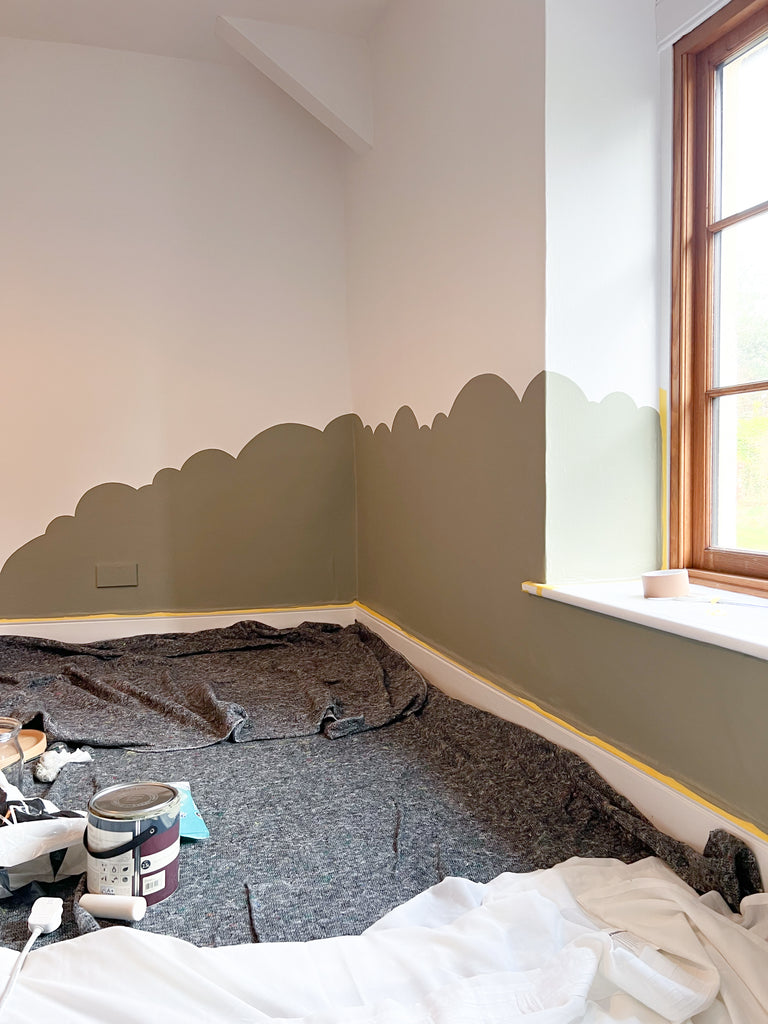
I feel like the scalloped paint effect is on it's way out, so I decided to create my own new style. If your child likes playing make-believe, then they will love this wall paint - it's like being in their own little forest or fairy garden, perhaps (wherever their minds take them!).
The beauty of this paint effect is that you don't need to be accurate like when painting scallops on your wall... there are no straight lines, and you don't need to be rigid about where you place your circular shapes.
WHAT YOU WILL NEED:

1. Round head paint brushes - these are the best for painting curves and fiddly shapes
2. A normal paint brush for filling in
3. Pencil for drawing around shapes
4. Paint tray

5. Round objects in different sizes to draw around, the more variation in size the better
6. A piece of card or paper to make a template of one of the circular shapes - you'll use this when you need to mark out your design on corners - see images below


7. Paint - I have used Farrow & Ball's "Treron" here, it's a beautiful green-grey, it's like a dark green version of their shade called "Pigeon", if you're familiar with that
8. Masking tape - optional
TOP TIP: think about where you will place furniture in the room, and have the circles undulate with it - as an example, I've placed the paint effect higher where the pillows go, and where I thought I may have a child's desk or play area. This ensures it doesn't get lost behind furniture. I took a photo of the room and drew over the top in order to plan out what would look best - this is fantastic as you can try as many options as you like, and paint colours (see image below)

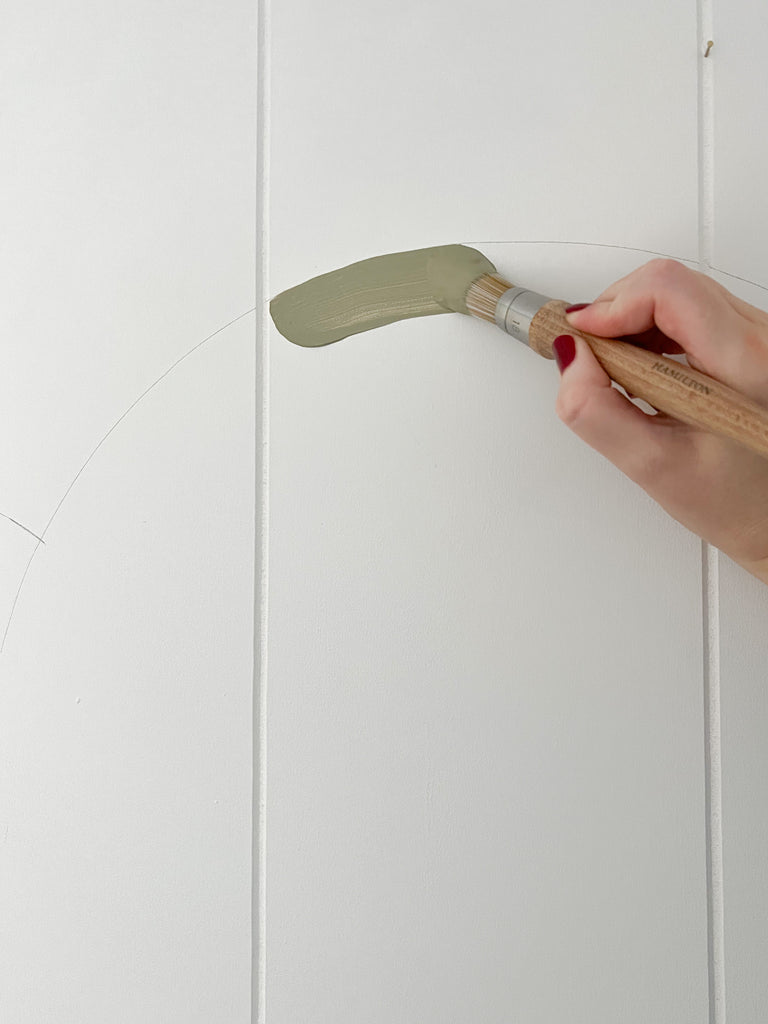
1. Draw around your circular objects with a pencil to create the desired shapes on the wall

2. Using your round head brush, paint over your pencil lines
TOP TIP: positioning your arm, using your elbow as the pivot point, and painting longer continuous round strokes, will give you a much better finish than trying to do lots of shorter paint strokes
TOP TIP: having a medium amount of paint on your brush will help you get neater lines. Overloading the paint will lead to drips and blobs, and too little paint will lead to streaks where no paint has taken to the wall - you'll then find it harder to fill in or complete the curve
3. Now, you don't need to take the paint all the way around the room - in fact, I prefer it when it tapers off, like the below. It also segregates the room a little, defining different areas, for things like reading, homework or play
And there you have it - your built in bed, complete with fun paint effect on the wall... your kiddies will love it!
Ps. If building a bed from scratch is off the cards, try cladding a cheap bunk bed with MDF for a similar effect... I love the IKEA bunk beds for this, especially the MYDAL bed.

SHOP THE LOOK:
,%20made%20of%20cob.%20There%20is%20not%20one%20straight%20wall%20or%20floor%20in%20here%20%E2%80%93%20which%20makes%20using%20it%20as%20my%20photography%20studio%20incredibly%20difficult....)